DDDについて学んだこと
この本、すごく素晴らしい。
作者さんのGitHubのIssueも併せて読みたい。読者さんからの質問に丁寧に答えられており、本を読んでいて思った「こういうパターンってどういう設計するのがベター?」といった疑問は大体解決出来る。
- DDDの「Entity」とORMの「Entity」は、別クラスとして定義する
- それぞれに
reconstructorというメソッドで変換処理を実装する
- それぞれに
- ドメインオブジェクト(Entityと値オブジェクト)の責務を超える業務処理については、Domain Serviceに実装する
- Domain Serviceの多用は厳禁。ドメインオブジェクトが痩せる
- Application Service(ユースケース)はエンドポイント単位に作成する
- RepositoryとDAOは別物である
- Repository: 集約の永続化
- Dao: テーブルの永続化
- ※RepositoryからDaoを呼び出すのはOK
- 集約の範囲を広げすぎるとパフォーマンスが下がる
- 集約を構成する全てのEntityと値オブジェクトを読み込む必要があるから
- パフォーマンスが下がるなら集約の範囲を再考する
- Presentation層、サービス層、インフラ層で別の例外を投げる
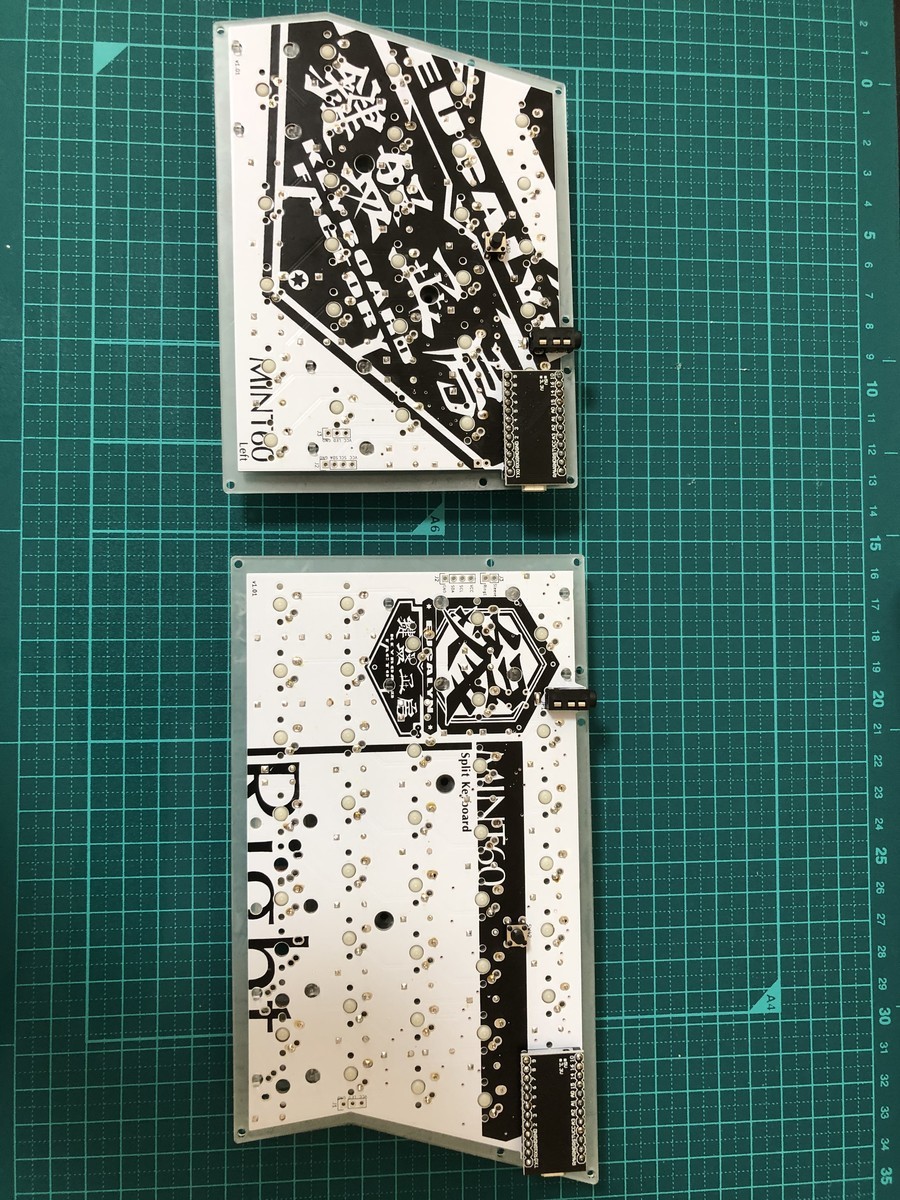
2台目のMint60を作った話
経緯
2年ほど前に初めて自作キーボードを作りました。
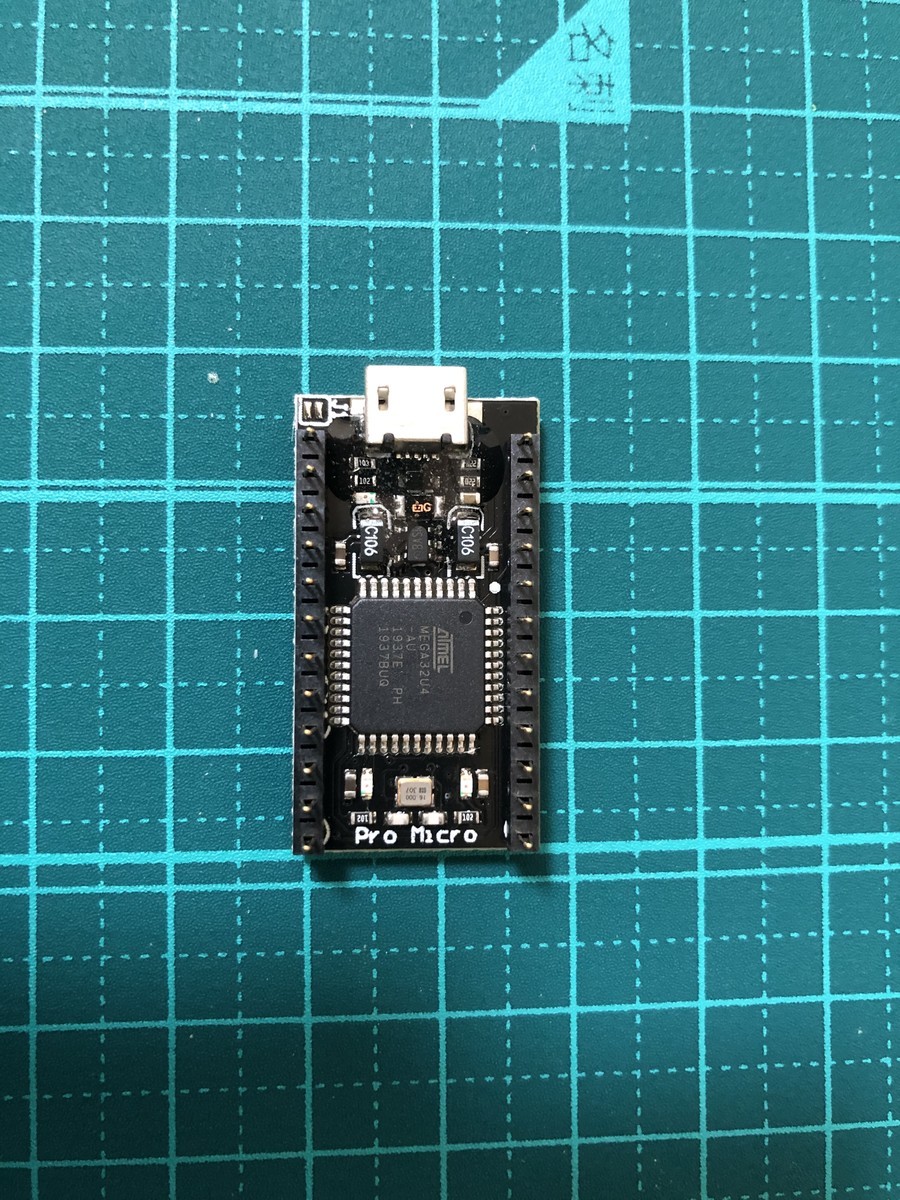
あれから暫く経ち,気が付いたら何かのタイミングで左側のProMicro(micro USB接続口)がもげてしまっていました。半田ごてやハンダ吸い取り機などを駆使して修理を試みたものの,みっしり入り込んだハンダと切断されたピンを除去することは出来ず,あえなく死亡確認――と相成りました。キーボード自体はとても使いやすく,期待していた通り肩こりにも効果大だったので,このタイミングで2台目を作ってみました。この記事では「壊れにくいMint60を作るためにはどうすればいいか?」という観点でポイントをまとめてみます。
必要なもの
- 半田ごて ※温度調整可能なもの
- ハンダ
- ニッパー
- プラスドライバー
- リードベンダー
- マスキングテープ
- ブレッドボード
上記は前回使用したものですが,今回は追加で以下も用意しました。
- コンスルー(スプリングヘッダ)
- エポキシ樹脂
Mint60を長期で使う時に問題になるのは,やはりProMicroがモゲることです。そこで「モゲにくくする」「モゲても交換しやすくする」という2点を考慮して改善してみました。なお,それぞれ以下で購入しています。

セメダイン 5分硬化型エポキシ系接着剤 ハイスーパー5 80gセット CA-186
- 発売日: 2020/01/01
- メディア: オフィス用品
ProMicroをエポキシ樹脂で補強する
これは「モゲにくくする」アプローチでの対策です。ProMicroのmicroUSBソケットの根本にエポキシ樹脂を爪楊枝で盛っていきます。エポキシ樹脂を扱うのも初めてだったのですが,固さとしてはやや緩い水飴ぐらいの感触で,爪楊枝の先に纏わりつかせて2,3回ソケットの根本に塗っていく感じです。最初はやや緩いので,多めに塗りすぎるとピンの穴まで流れる可能性があります。回数的には2度ぐらいでちょうどいいと思います。この作業を左右2度行います。完全に固まるまで丸1日放置しておきます。
コンスルーをProMicroに装着する
これは「モゲても交換しやすくする」アプローチでの対策です。Mint60のキットに入っているピンは,基板とProMicroの両方でハンダ付けするタイプなので,最悪ProMicroがモゲた場合は冒頭で私が失敗したプロセスをクリアーしないといけなくなります。ただ,それはいささか難易度が高いため,ここではコンスルーを利用します。コンスルーは,基板側にハンダ付けが不要なタイプのピンです。基板にグッと押し込んでやれば,接着なしで通電する仕様になっているので,何かあった場合にProMicroを容易に交換出来るというメリットがあります。※基板側の穴が摩耗するので無限に交換は出来ません。何かあった場合の保険として使えるぐらいにお考えください。
Mint60も途中からコンスルー対応基板になったようです。
あ、そうだ。今回のロットからMint60もコンスルー対応基板となっております。
— ゆかり𓂙 (@eucalyn_) 2018年12月12日
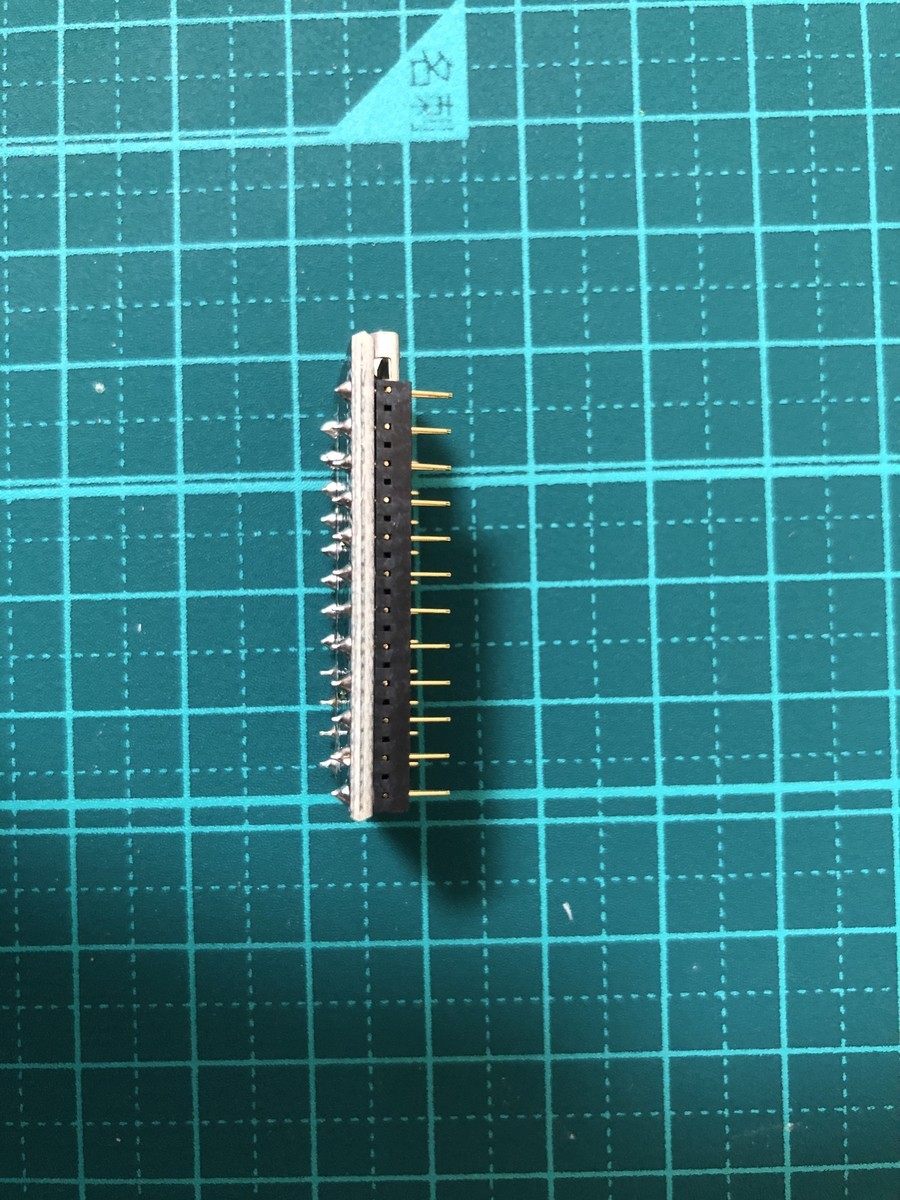
コンスルーの向きには要注意です。小窓が付いている方を外向きにした上で,小窓が近い方のピンをProMicroにハンダ付けしていきます。
他の手順はビルドガイドと同じ
後は公式のビルドガイドと同じです。
完成品
ハンダ付け2回目だったので綺麗に出来た。
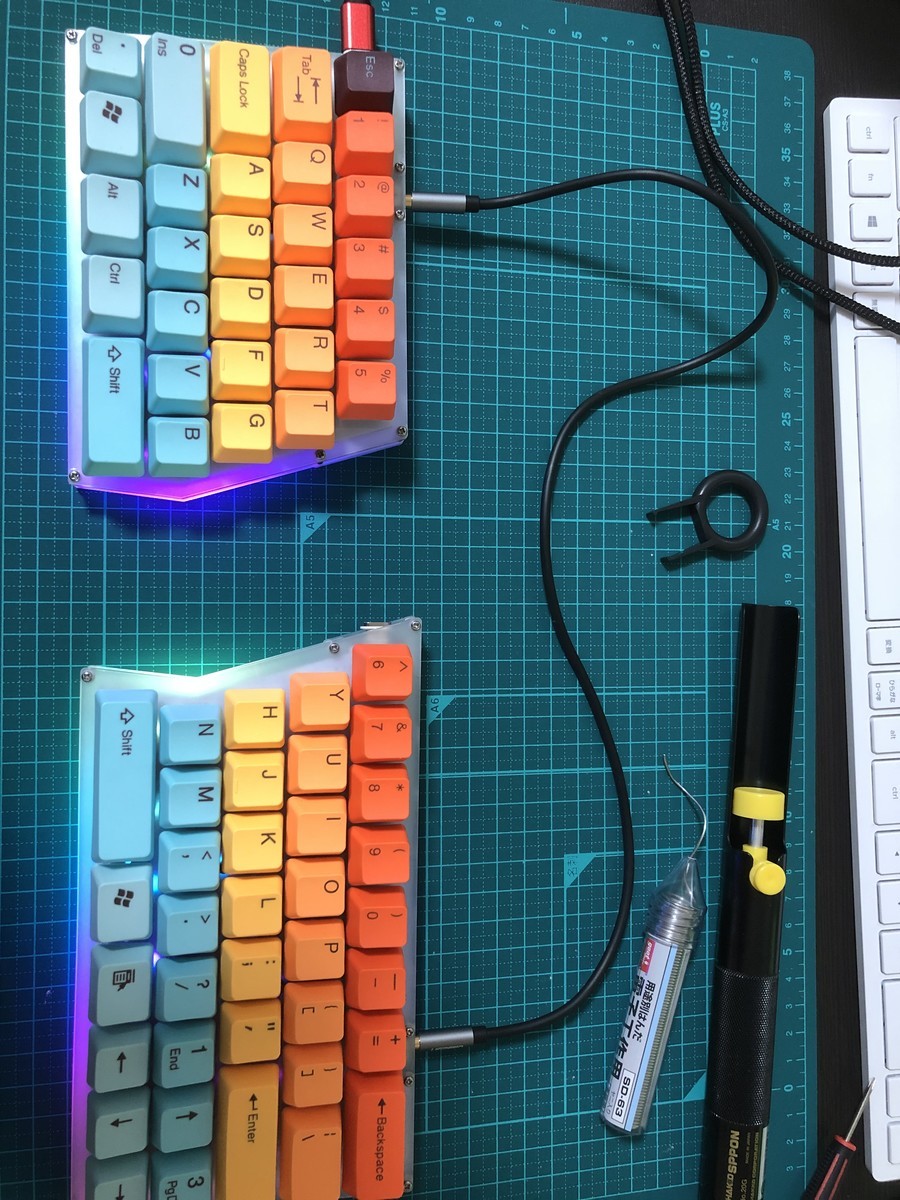
今度は大事に使っていきたいです。
完成――と思ったら
Fn + TabでLED切り替えが利かないことに気付きました。左側は正常にON/OFFおよびLEDのパターン変更出来るものの,右側は常に点灯しっぱなし。ProMicroを左右交換しても,右側のLEDテープのハンダ付けをやり直してみても直る気配がない。「そういえば1台目作ったときも似たような挙動になった記憶が……」と思い出しつつ,ダメ元で標準のキーマッピングを左右のキーボードに焼き込んだら直りました。スターターキットに含まれているProMicroのデフォルトマッピングが変なのかもしれません。
直ったものの,Fn + TabでLEDをOFFにした時の挙動が1台目と違う点が気になる。左→右とタイムラグで消える挙動は前はなかったような。。。些細な点なので影響はないのですがね。
Next.jsのテスト環境を構築する
1. Next.jsの環境を作成する
公式ページの手順で雛形プロジェクトを生成する。
npx create-next-app
2. テスト関係の依存ライブラリを導入する
導入するのは以下のライブラリ。
- jest
- @babel/preset-env
- @babel/preset-react
- enzyme
- enzyme-adapter-react-16
Enzymeは手に馴染んでいるので使っているだけなので,必須ではないです。
npm i -D jest @babel/preset-env @babel/preset-react enzyme enzyme-adapter-react-16
3. Jestの設定ファイルを生成する
./node_modules/.bin/jest --init
対話モードで色々聞かれるので手元の環境に合わせて回答する。
4. babelの設定ファイルを作成する
プロジェクト直下に.babelrcを作成する。
↑で導入したプリセットファイルを使う設定はここに書く。
{
  "presets": [
    "@babel/preset-env", "@babel/preset-react"
  ]
}
5. Jestのセットアップファイルを作成する
Enzymeの初期設定処理を実装するファイルjest.setup.jsを作成する。
import Enzyme from "enzyme";
import Adapter from "enzyme-adapter-react-16";

Enzyme.configure({ adapter: new Adapter() });
6. テストコードを用意する
テストコードを実装する。ファイルは__tests__に置く。
import React from "react";
import {shallow} from "enzyme";
import Sample from '../pages/sample'

describe("Sample", () => {
  test("h1タグが描画されること", () => {
    const wrapper = shallow(<Sample />);
    //TODO: チェック処理を実装する
  });
});
7. テストを実行する
npm test

 PASS  __tests__/sample.test.js
  Home
    ✓ h1タグが描画されること (3 ms)

Test Suites: 1 passed, 1 total
Tests:       1 passed, 1 total
Snapshots:   0 total
Time:        1.689 s, estimated 2 s
Ran all test suites.
Re:VIEW StarterのA4対応
脱Wordを掲げてAsciidocを使う日々が終わりそうです。
Asciidocも悪くないのですが,以下の点が気になっていたのでこれを期にRe:VIEWに乗り換えようかと思っています。
- 英語(例: Amazon Web Services)を入れると変にスペースが出来る
- PDF出力すると文字装飾が上手く働かない時がある
ただ,会社での用途はA4サイズのレポート作成なので,Re:VIEW Starterが対応しているB5 or A5サイズだと都合が悪いのです。というわけで,Re:VIEW Starterが生成するファイルを変更してA4対応やってみました。
config.yml
texdocumentclass: ["jsbook",
    #"uplatex,papersize,twoside,b5j,10pt,openright" # B5 10pt 右起こし
    #"uplatex,papersize,twoside,b5j,10pt,openany"   # B5 10pt 両起こし
    #"uplatex,papersize,twoside,a5j,9pt,openright"  # A5  9pt 右起こし
    #"uplatex,papersize,twoside,a5j,9pt,openany"    # A5  9pt 両起こし
    #"uplatex,papersize,oneside,a5j,10pt,openany"   # A5 10pt 両起こし(タブレット向け)
    #"uplatex,papersize,twoside,b5j,10pt,openright"
    "uplatex,papersize,twoside,a4j,10pt,openright" # A4対応
]
#
sty/mytextsize.sty
%% 本文の幅を設定
\setlength{\textwidth}{50zw}  % 全角44 --> 50文字 出力結果みて調整する
\setlength{\fullwidth}{\textwidth}  % ヘッダの幅を本文と同じにする
これでそれっぽくなります。
Firebaseに入門してみた
あけましておめでとうございます。今年は公私共に実りのある1年にするべく,決意を新たに頑張りたいと思います。Qiitaやはてなブログでのアウトプット,GitHubでのソース公開も積極的に行っていきたいですね。(今の会社からそろそろ巣立とうかと考えながら……)
年始の時間を利用して,前から触ってみたかったGoogleのmBaaSであるFirebaseを試してみました。ホスティング機能だけしか触れていませんが,Googleアカウントさえ持っていればCLIから簡単にアプリをデプロイ出来て便利ですね。 今回はVue.jsで作ったアプリ(Vue CLIが生成するデフォアプリ)をFirebaseにデプロイしてみたので,忘備録がてら手順を書いてみたいと思います。
前提環境
- node.js: 8.9.4
- npm: 6.5.0
- Vue CLI: 3.2.2
1. Firebase Consoleからプロジェクトを作る
ブラウザからFirebase Console(https://console.firebase.google.com/u/0/?hl=ja)にアクセスしましょう。トップページから「プロジェクトを追加する」を選択し,任意の名前でプロジェクトを作成しましょう。ここで入力したプロジェクト名+乱数がアクセス先のURLになります。
2. Firebase Toolsをインストールする
Firebaseの操作をCLIから行うためのツールFirebase Toolsをnpm経由でインストールしましょう。
npm install -g firebase-tools
3. 公開対象のアプリを作る
ここは単純にVue CLIを任意の設定で実行していただければOKです。今回は雛形アプリをそのまま使うのでbuildコマンドで最終成果物まで生成しておきます。要点としては,最終成果物はdistディレクトリに出力される点だけ覚えておきましょう。
4. Firebaseにログインする
ここからFirebase Toolsを使っていきます。
firebase login
まずはログイン処理です。Vue CLIで作成したプロジェクトのルートで上記のコマンドを実行します。すると,ブラウザが起動してFirebase ToolsとGoogleアカウントの紐づけ処理および権限委譲のダイアログが表示されるので,基本的にOKで前に進めていきましょう。成功すると,コンソールに以下のメッセージが表示されるはずです。
Waiting for authentication...

+  Success! Logged in as xxxxxxxxx@gmail.com
5. Firebaseプロジェクトを初期化する
続いてVueプロジェクトをFirebaseプロジェクトとして初期化します。
firebase init
Firebaseのどの機能を使うのか聞かれるのでHostingを選択します。
firebase init

     ######## #### ########  ######## ########     ###     ######  ########
     ##        ##  ##     ## ##       ##     ##  ##   ##  ##       ##
     ######    ##  ########  ######   ########  #########  ######  ######
     ##        ##  ##    ##  ##       ##     ## ##     ##       ## ##
     ##       #### ##     ## ######## ########  ##     ##  ######  ########

You're about to initialize a Firebase project in this directory:

  C:\development\firebase\sample_app

Before we get started, keep in mind:

  * You are currently outside your home directory

? Are you ready to proceed? Yes
? Which Firebase CLI features do you want to setup for this folder? Press Space to select features, then Enter to confi
rm your choices. Hosting: Configure and deploy Firebase Hosting sites

=== Project Setup

First, let's associate this project directory with a Firebase project.
You can create multiple project aliases by running firebase use --add,
but for now we'll just set up a default project.

? Select a default Firebase project for this directory: [don't setup a default project]

=== Hosting Setup

Your public directory is the folder (relative to your project directory) that
will contain Hosting assets to be uploaded with firebase deploy. If you
have a build process for your assets, use your build's output directory.

? What do you want to use as your public directory? dist
? Configure as a single-page app (rewrite all urls to /index.html)? Yes
? File dist/index.html already exists. Overwrite? No
i  Skipping write of dist/index.html

i  Writing configuration info to firebase.json...
i  Writing project information to .firebaserc...

+  Firebase initialization complete!
注意すべき箇所があるとすれば以下ぐらいです。
? What do you want to use as your public directory? dist
? Configure as a single-page app (rewrite all urls to /index.html)? Yes
? File dist/index.html already exists. Overwrite? No
6. デプロイする
超簡単。
firebase deploy --project [projectId]
projectIdはFirebase Consoleから確認できます。
=== Deploying to 'xxxxxxxxx'...

i  deploying hosting
i  hosting[xxxxxxx]: beginning deploy...
i  hosting[xxxxxxx]: found 8 files in dist
+  hosting[xxxxxxx]: file upload complete
i  hosting[xxxxxxx]: finalizing version...
+  hosting[xxxxxxx]: version finalized
i  hosting[xxxxxxx]: releasing new version...
+  hosting[xxxxxxx]: release complete

+  Deploy complete!

Project Console: https://console.firebase.google.com/project/xxxxxxx/overview
Hosting URL: https://xxxxxxx.firebaseapp.com
5分ほどで環境構築からデプロイまで終わってしまいました。Firebase……恐ろしい子ッ!!
Mint60を作ってみた
ゆかりさんが販売されている自作キーボードのMint60を買いました。元々,職場ではMistelのBAROCCOを使っていたのですが「自宅でも分離型のキーボードが使いたい!」という思いから,電子工作初心者にも関わらず組み立てにチャレンジした次第です!
今回は電子工作初心者目線で,Mint60を組み立てた感想を書いてみます。結論を最初に述べると「電子工作初めてでも完成までたどり着けるよ!!」と初心者の方に伝えたいです。せっかくはんだごてを購入したので,キーボード以外のものも作ってみたいなと思うようになりました。
私の電子工作経験
- 最後に半田付けしたのは中学生の頃
- 電子工作の道具は今回初めて買った
使った機材
- はんだごて
- 温度調整機能付きのものを購入しました

- 出版社/メーカー: 白光(Hakko)
- 発売日: 2012/01/18
- メディア: Tools & Hardware
- クリック: 1回
- この商品を含むブログを見る
- こて先
- 2Cサイズが重宝します
")
こて先 はんだごて先 5種類 2C 3C SK 2.4D I(クリーニングスポンジ付き)
- 出版社/メーカー: カイイ株式会社
- メディア: その他
- この商品を含むブログを見る
- こて台
- スチールウールではんだを掃除出来るのでコテ先の温度低下を防止できます
 こて台 633-01")
- 出版社/メーカー: 白光(Hakko)
- メディア: Tools & Hardware
- 購入: 1人 クリック: 2回
- この商品を含むブログを見る
- ハンダ
- 片手でハンダを引き摺り出しながら使えるので便利でした

- 出版社/メーカー: 太洋電機産業(goot)
- メディア: Tools & Hardware
- 購入: 1人 クリック: 1回
- この商品を含むブログを見る

サンハヤト リードベンダー RB-5 リード線、部品の簡易折り曲げ器
- 出版社/メーカー: サンハヤト
- メディア: Tools & Hardware
- この商品を含むブログを見る
電子工作初心者ゆえの困惑
- はんだをどれだけの量盛っていいのか分からない……
- 基盤を焦がさないか心配になる
はんだづけのポイント
- はんだごての温度は370℃程度であれば焦げたりしない
- コテ先(C2)の平らな部分ではんだを溶かす
- そこから重力で滑らせるイメージを持つ(適量が自然と流れ落ちる)
- ぷっくらするまではんだを垂らさなくてOK
- こまめにコテ先のはんだ付着を落とす
- ↑で紹介したコテ台はコテ先を拭いても温度が下がらないので便利です
完成後に気付いた不具合
- 右側の下段(N~?ぐらいまで)が反応しない
- ケースと合体すると高確率で反応しない。ケース外すと復活。
- 「Y」が反応しない
対策
- 右側下段が反応しない問題
- 他の方も書いておられますが,LEDテープとキースイッチの足の干渉でした
- はみ出ているキースイッチの足をニッパーで切り落としたら直りました
- 「Y」が反応しない
使用感
- 静音赤軸を初めて使ってみたが,その名の通り静かで素晴らしい
- スタビライザが内蔵されているキーはちょっとだけ音が気になる
- キー配置が普段使っているものと違うのでなれるまで時間かかりそう
AsciiDocでテーブルの中に画像やコードを表示したい!
AsciiDocが便利なので近頃ちょくちょく活用しています。もうWordやExcelには戻りたくないほど感動的な体験で,「今後作る設計書は全てAsciiDocで作ってやろう……!」と堅く心に誓ってしまうほどです。どの部分に惹かれるかは人それぞれですが,私にとっては以下の特徴が魅力的に感じました。
- 表紙や目次を持ったフォーマルな文書作成をサポートする機能が多い
- 下手にWordで頑張るより小奇麗なファイルが生成される
- ドキュメント作成時のデザイン崩壊事故が起きにくい
(デザイン定義が別ファイルになるので基本触らない) - ソースコードのSyntaxHighlightが効く
そんなわけで便利なAsciiDocなのですが,ちょっと困ったことがあったので今日はその紹介を……。
テーブルの中に画像を表示したい!
要するに↓みたいなことをやりたかったのです。

でも普通にAsciiDocを書くと
|===
|1-1|2-1

|image::sample.jpg[width="100", align="center"]
|2-2

|1-3
|2-3
|===

こんな感じで残念な表示をされてしまいます。
対策は……?
意外と簡単に対策できました。
|===
|1-1|2-1

a|image::sample.jpg[width="100", align="center"]
|2-2

|1-3
|2-3
|===
内部でAsciiDocの文法を解釈させたいセルの直前に「a」を追加します。
出た!
画像だけでなくSyntaxHighlightも効くので↓みたいなことも可能です。

別解
テーブルのヘッダ定義部分をイジっても同じことが出来ます。
[cols="1a,1"]
|===
|1-1|2-1

|image::sample.jpg[width="100", align="center"]
|2-2

|1-3
|2-3
|===
特定列だけ常にAsciiDocを解釈して欲しいなら,こちらの方がラクですね!